Retroactive Start in ServiceNow – The Overlooked Setting That Can Change Your SLA Game
Anyone who has worked with ServiceNow long enough knows this SLAs are the backbone of accountability. They tell you how your IT team performs and whether customers are getting help on time. But there’s one subtle feature that quietly changes everything about how you measure time: Retroactive Start.
It’s one of those options people often skip past while defining an SLA, thinking, “It’s just another checkbox.” But once you understand it, you realize how much it matters in real-world service management.
Let’s explore this feature the way you’d explain it to a new team member simply, practically, and from experience.

A Story That Explains It All
It’s Monday morning. A user reports that their business-critical application isn’t loading. They log a ticket at 9:00 AM. The Service Desk, overloaded with requests, classifies it as medium priority.
At around 11:30 AM, someone from the IT Operations team notices the impact and upgrades it to critical. The system immediately attaches a new Priority-1 SLA, giving the team four hours to resolve the issue.
But think for a second the problem started at 9:00, not 11:30. From the customer’s point of view, they’ve already been waiting two and a half hours.
Yet, the SLA timer starts ticking only from 11:30.
That’s misleading. It makes it look like the team met the SLA even though the user waited much longer than promised.
This is exactly where Retroactive Start steps in. When enabled, it pushes the SLA’s start time back to when the record was first created in this case, 9:00 AM. Now, the system measures the real elapsed time, not just the technical trigger point.
So, What Exactly Is Retroactive Start?
Retroactive Start is a setting inside the SLA Definition in ServiceNow that allows you to start your SLA timer from an earlier event rather than the moment it’s attached.
Normally, ServiceNow starts the SLA when the defined conditions are met. But sometimes, the SLA condition gets fulfilled late for example, after reassignment or when the priority changes.
Retroactive Start simply says, “Don’t start now start from back then.”
You can select which date/time field defines that “back then” moment it could be the record’s Created, Opened, or Assigned time. This ensures the SLA clock reflects how long the issue has truly been open, not when someone realized it deserved an SLA.
Why Does It Matter So Much?
It’s easy to think this feature is minor, but in service delivery, perception is everything.
Here’s why enabling Retroactive Start can completely change the way your SLAs tell your story.
It Shows the True Customer Experience
From a customer’s viewpoint, the waiting starts the moment they raise a ticket not when IT updates it. Retroactive Start respects that timeline and gives a genuine view of responsiveness.
It Builds Credibility in SLA Reports
Without it, SLA reports can look unrealistically good because they ignore early delays. When your reports align with reality, you build trust with leadership and clients.
It Ensures Fair Accountability
Different teams handle tickets at different stages. Retroactive Start ensures all that time counts toward performance, not just the final group that attached the SLA.
It Helps During Audits
When audits or customer reviews happen, it’s important to show transparent, traceable timing. Retroactive Start provides that clarity — no gaps, no excuses.
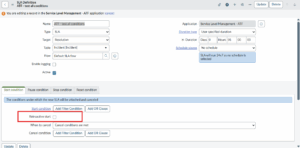
How to Enable Retroactive Start
Here’s how you configure it practically:
- Go to Service Level Management > SLA Definitions.
- Open the SLA definition you want to modify or create a new one.
- In the Start Condition section, you’ll see a box labeled Retroactive start check it.
- A field called Set start to will appear.
Select the field you want the SLA to start from (for example, “Created”).
- Optionally, you can also enable Retroactive pause, which accounts for any paused time that occurred before the SLA attached.
- Save and test it using a few sample tickets.
From that point on, every SLA under this definition will look backward to calculate its start time.
The Power of a Simple Example
Here’s a quick example that makes it clear:
- Ticket created: 9:00 AM
- SLA attached (after priority change): 12:00 PM
- SLA target: 4 hours
Without Retroactive Start:
The SLA starts at 12:00 → target time = 4:00 PM
With Retroactive Start:
The SLA starts at 9:00 → target time = 1:00 PM
That’s a massive difference — three hours of extra accuracy.
When you look at it from a management point of view, this means your SLA dashboards now reflect real waiting time. It’s a more honest measure of performance.
Common Pitfalls
Like any powerful feature, Retroactive Start comes with its own challenges.
If you enable it without planning, you may run into these issues:
- Instant Breach Alerts:
If your SLA target is short and the “Set start to” time is much earlier, the SLA might breach the moment it’s attached.
- Complex Pause Logic:
If the record was on hold or waiting before the SLA started, you’ll need to decide whether that time should count. Using “Retroactive pause” helps, but only if configured correctly.
- Confused Reporting:
After enabling it, reports may suddenly look worse not because your performance dropped, but because you’re now measuring it honestly. Always communicate that change to management.
- Multiple SLA Transitions:
If incidents switch between priorities or assignment groups often, overlapping SLAs can create confusing timelines. Thorough testing helps avoid that.
Best Practices for Using Retroactive Start
To make the most of this feature, keep these practical tips in mind:
- Understand your SLA policies clearly.
If your policy states that the SLA time begins at ticket creation, Retroactive Start is essential.
- Pick the right field for “Set start to.”
Usually, “Created” works best, but if your process involves custom fields, choose carefully.
- Always test before rollout.
Create test tickets, attach SLAs, and confirm the start time aligns with business rules.
- Avoid using it for very short SLAs.
For SLAs with targets under an hour, retroactive start can create chaos with instant breaches.
- Educate your teams.
Let everyone know why SLAs may appear “already running” or breached when attached. Transparency reduces confusion.
- Review after implementation.
Check reports for a few weeks after enabling Retroactive Start. If the numbers look worse, explain that they’re now more accurate — not actually declining.
Retroactive Start vs. Normal Start (Quick Snapshot)
| Feature | Normal Start | Retroactive Start |
| SLA begins | When SLA attaches | From earlier defined event |
| Accuracy | Limited | Highly accurate |
| Risk of instant breach | Low | Moderate (if configured late) |
| Ideal for | Simple workflows | Escalations, reassignments, complex flows |
| Reports reflect | Technical trigger | True customer experience |
The Real Takeaway
The Retroactive Start option may seem tiny, but it’s one of those features that separates a technically correct system from a business-accurate one.
It’s about honesty in data showing exactly how long customers have been waiting, no matter how the ticket moved internally. For service desk managers, it means fairer measurements. For analysts, it means cleaner reporting. And for administrators, it’s a small setting that delivers a big impact.
Think of it this way: Retroactive Start gives your SLA a memory.
It remembers when things really began not just when someone pressed the right button.
So, the next time you define or review an SLA, pause and ask yourself are we starting at the right time?
If the answer is “not yet,” you know which checkbox to check.


No comment